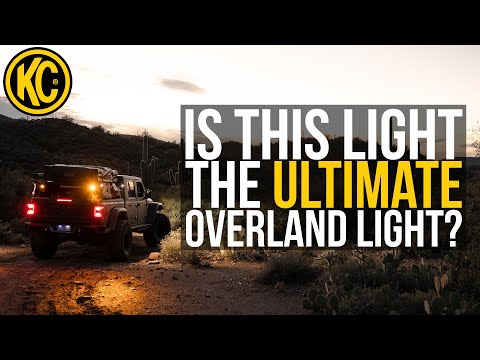
The BEST NEW Light for Overlanding Rigs

The BEST NEW Light for Overlanding Rigs
Exploring 3 Ways to use the FLEX ERA® 1 Lights for a perfect fit on camping and overlanding rigs.

Overview
- How is the FE1 so versatile?
- Use #1 - The Underdog - side area flood lights
- Use #2 - The Safety Pick - rear facing chase/dust lights
- Use #3 - The Crowd Favorite - ditch or a-pillar lights
We’ve all been there. Loading the truck with all of the gear and food took a little bit longer than expected, you stopped for one last coffee before heading out of town, and then you underestimated how long the trail itself was going to be. Before you know it, you’re on the hunt for a campsite at night.
Off-road lights are often used for more than just seeing obstacles in front of you while you’re wheeling, and can come in useful in quite a few scenarios beyond just that. Having lights that assist you in all of those other scenarios is just as important, and are even more beneficial than most people realize.
Enter the long-awaited KC FLEX ERA® 1. This little light is by far the most versatile light in the FLEX ERA Family, and can step in to wear multiple hats when needed. In this article, we’re going to cover three of the best ways that the FE1 lights can be used on a rig that’s setup for camping, exploration, and overlanding. But first, let’s take a look at what makes it so versatile to be used in a range of scenarios.
How is the FE1 so versatile?
DO EVERYTHING - SIZE and PERFORMANCE
Contained in a compact size of less than 2.7”, the FLEX ERA® 1 packs major performance in a versatile package that can be used as forward-facing, side-facing, or rear-facing lighting. For overlanding rigs that are often scouting out new campsites or pulling in late at night, this is pivotal to have good periphery lighting. With 2,430 lumens of power in the full-power mode, the FE1 is the perfect companion for cruising trails or setting up camp with your friends.
HAVE EVERYTHING - MASTER KITS
Adding to the versatility even more is how we chose to kit the FLEX ERA 1 lights. Each set of FE1 lights comes standard as a Master Kit meaning that every box will include all three different beam pattern lenses and all of the other necessities so less time is spent in the garage and more time out on the trails.
SEE EVERYTHING
For all of the nooks and crannies, the FE1 mounting bracket was designed asymmetrically to make sure you can mount the light practically everywhere. It features adjustable mounting depth, width, height, and orientation all within the included brackets. This means it can easily be installed onto roof racks, bed racks, front or rear bumpers, and so much more.
How can the FLEX ERA 1s be used on an Overland Vehicle?
Because of the versatility outlined above, the FE1s can be used for anything from forward facing lighting to side lights to rear facing lighting. Let’s take a look at each one of these in particular to give you a little bit more of an idea on some of the most popular uses for these compact and powerful lights.
Use #1 - The Underdog - Overlanding Scene Lights
Often overlooked but perhaps some of the most useful lights for those that actually use their rig to go camping are lights that light up the sides of the vehicle. Those that have used these before will never give them up, but the majority of folks haven’t yet experienced them. These are often best when using a flood beam pattern as you’ll typically want a big broad area lit up immediately around the vehicle, rather than an area further away light a spot or a spread beam will illuminate. Mount the FLEX ERA 1 lights to the sides of a bed rack or the sides of a roof rack, and aim them perpendicular to the direction of travel of the vehicle and slightly angled downwards to get the most bang for your buck by using them as side/area flood lights. These will give you plenty of light to set up or tear down camp at dark, cook some grub, or anything else you may need to see during your adventure at camp.
Use #2 - The Safety Pick - Rear-Facing Dust Lights
It might not be the most glamorous or sexy way to use a light, but it sure is a great way to ensure your rear-end is protected. Literally. When you have lights mounted in the back of your vehicle and aimed backwards, they can serve a couple of purposes but the best one is to allow those traveling behind you in heavy dust conditions to see exactly where you are when all else has disappeared in a cloud of silt either in the day time or the night time. Throw an Amber Shield on them for just as much visibility, with a softer light to not blind people behind you at night when it is clearer. These can be mounted anywhere like flush mounted into a rear-bumper, on a bed-rack or even on a factory bed-rail. And bonus! These can also act as nice reverse lights if aimed properly.

Use #3 - The Crowd Favorite - Ditch Lights
Perhaps the most obvious and most well-known way to use FLEX ERA 1 lights on a dedicated overlanding style vehicle is to mount them onto the a-pillars and angle them outwards slightly to illuminate the sides of the trail. This is an incredibly popular location to mount lights and goes by a few different names ranging from ditch lights to a-pillar lights to cowl lights. The small size of the FE1s will mean that they won’t impede your line of sight so much, while the 2340 lumens of output will ensure plenty of brightness to light up the short- to mid-range distances.
